
TL;DR
Acoustic treatment in closets is about more than foam—it’s about placement, sealing gaps, and proper ventilation. Moving gear away from your main workspace often beats adding more foam. Combining absorption, barriers, and airflow management creates a quiet, effective rig.
Ever wondered why your closet setup sounds better than your desk, but still leaves you with lingering echoes or noisy fans? The secret isn’t just the foam. It’s where you put your gear, how you seal the space, and how you manage heat. Making a closet into a quiet, effective studio or AI rig isn’t magic — it’s smart strategy.
In this guide, you’ll learn why distance beats foam, how to treat your closet for both sound and heat, and the little tricks that turn a cramped space into a professional-sounding booth. Whether you’re recording vocals or running a high-power AI rig, these tips will help you get there faster.
Acoustic dampening
& the rig in the closet.
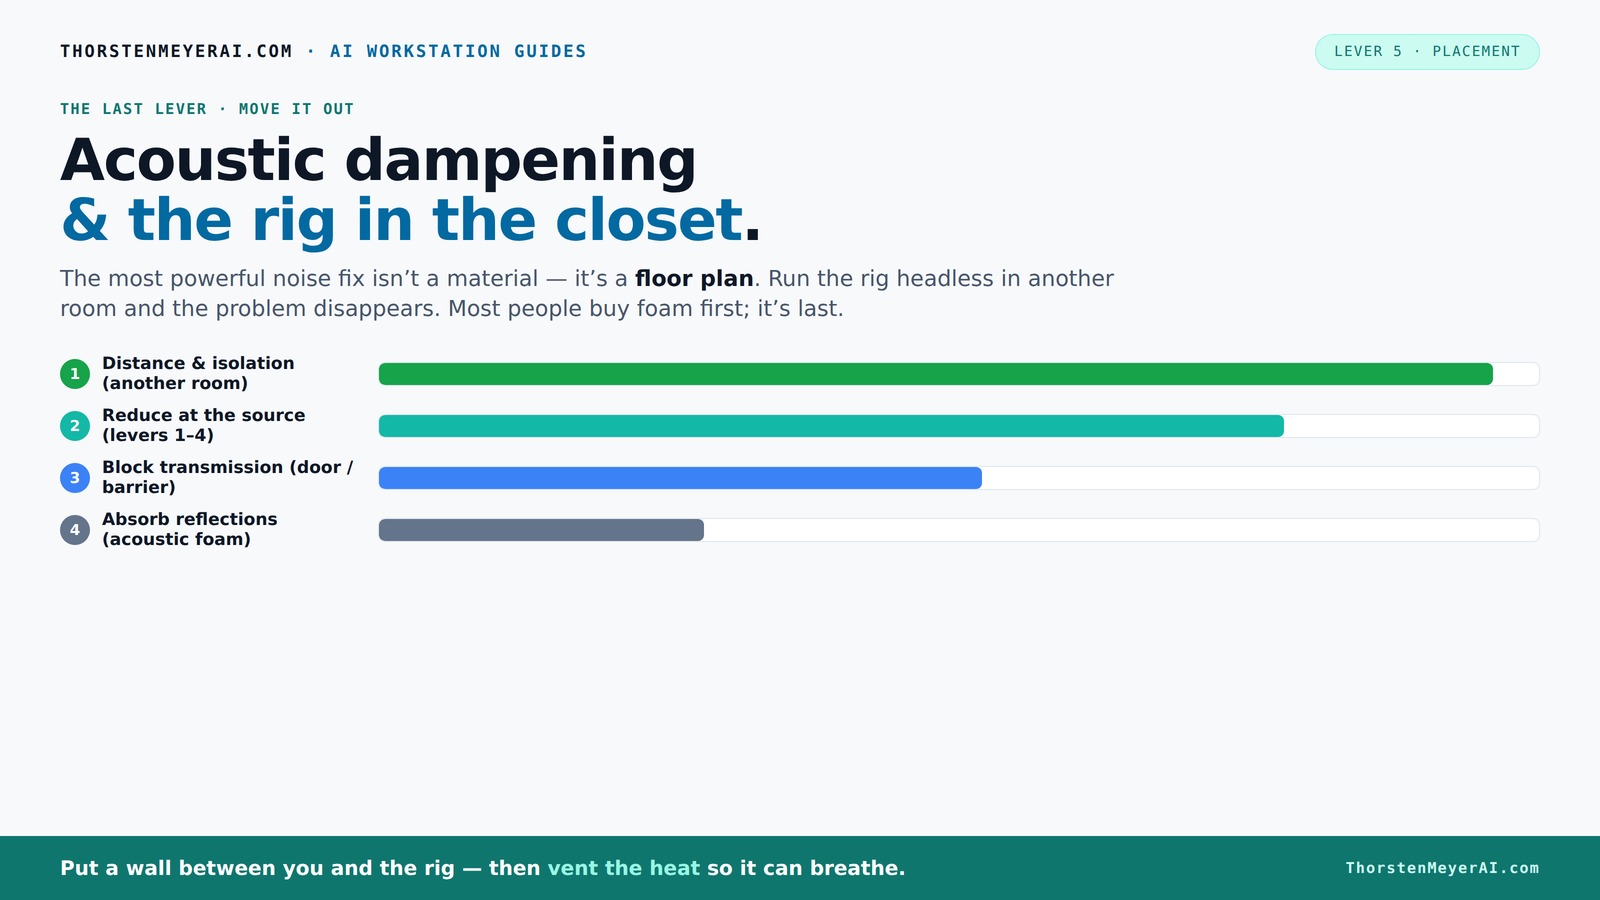
The most powerful noise fix isn’t a material — it’s a floor plan. A rig you can’t hear because it’s in another room beats any amount of foam. Tap the approaches in Part 1 to see what actually works.
(another room)
(levers 1–4)
(door / barrier)
(acoustic foam)
Contain the noise, not the heat
Key Takeaways
- Moving your rig to another room is the most effective noise reduction; foam alone can’t match the benefit of distance.
- Sealing gaps around doors and vents is critical for true soundproofing; don’t rely solely on acoustic foam.
- Proper ventilation prevents overheating in closet setups, especially when placing high-power rigs in enclosed spaces.
- Treat reflection points and corners with thicker foam or bass traps to reduce echo and low-end muddiness.
- Mic placement facing treated surfaces and away from hard reflections dramatically improves vocal clarity.

Soundproof Room Divider with Wheels, 66in Office Dividers for Sound Proofing & Reducing, 3 Panel Sound Proof Dividers for Office Partitions Portable Temporary Wall Acoustic Wall Divider,Light Grey
BLOCKING OUT DISTRACTIONS: YASRKML Office Partitions is made of ECO-friendly, flame-retardant PET material with Fabric wrapping, which can...
As an affiliate, we earn on qualifying purchases.
As an affiliate, we earn on qualifying purchases.
Why Soundproofing and Dampening Are Not the Same — Know the Difference
Soundproofing and acoustic dampening work hand-in-hand but serve different purposes. Soundproofing involves creating barriers that prevent sound from transmitting between spaces, which is crucial if you need to keep noise contained or block external sounds. Dampening, on the other hand, focuses on reducing echoes and reflections within a space, making recordings clearer and more controlled.
Understanding this distinction is vital because it influences your approach. For example, sealing gaps around your closet door with weatherstripping directly enhances soundproofing, preventing noise from leaking out. Meanwhile, adding foam panels on the walls reduces internal reflections, improving clarity. The tradeoff is that soundproofing often requires more effort and investment—like adding mass or specialized barriers—whereas dampening is usually simpler and more affordable but less effective at blocking sound transmission. Combining both strategies—sealing gaps and treating reflection points—creates a more comprehensive solution, but neglecting one can undermine your entire setup. Recognizing what matters most for your goals helps prioritize actions and avoid wasting resources on ineffective measures.

Focusound 52 Pack Acoustic Foam Panels 1" x 12" x 12" Sound Proof Foam Panles Soundproofing Noise Cancelling Wedge Panels for Home Office Recoding Studio with 300PCS Double-Side Adhesive
Soundproofing - Acoustic foam panels triangular grooves structure for better noise absorption, helps to reduce and absorb unwanted...
As an affiliate, we earn on qualifying purchases.
As an affiliate, we earn on qualifying purchases.
The Power of Placement: Why Moving Your Rig Is the Biggest Noise Hack
The most effective way to reduce noise isn’t just adding foam or barriers; it’s spatial separation. Moving your high-noise equipment away from your main workspace can dramatically reduce perceived sound levels. When your rig is in another room, basement, or closet, the sound waves weaken over distance, and physical barriers like walls and doors absorb or reflect sound, preventing it from reaching your ears.
This isn’t just about convenience; it’s about acoustic physics. Sound intensity drops roughly by 6 dB for every doubling of distance in free field conditions. So, relocating a noisy machine can cut noise levels significantly—sometimes by more than 60%. This approach also offers flexibility: it allows you to keep your workspace uncluttered and free of soundproofing clutter, focusing your efforts on strategic placement instead.
Furthermore, placing the rig in a different room reduces the need for complex and costly treatments in your primary space. It’s a tradeoff: you invest in spatial planning and possibly some door seals, rather than extensive wall treatments. For high-power rigs, this separation also aids in heat management, which is often overlooked but critical for maintaining performance and noise levels. The key implication? Prioritize placement over material; it’s often the simplest, most cost-effective way to achieve a quieter environment.

Audimute Soundproofing Acoustic Door Seal Kit - Door Sweep and Seal - (Standard Size)
Includes a Door Seal (3/16" x 1/2" x 25') and a Door Sweep (1/2" x 1.5" x 4').
As an affiliate, we earn on qualifying purchases.
As an affiliate, we earn on qualifying purchases.
The 'Rig in the Closet' Setup — How to Do It Right Without Overheating
Placing a high-power rig in a closet promises quiet operation but introduces significant thermal challenges. Without proper heat management, components like GPUs and CPUs can quickly overheat, leading to thermal throttling—where performance drops to prevent damage—and increased noise from fans spinning at maximum speed. For more tips on managing this, see Acoustic Dampening, Placement, and the "Rig in the Closet" Setup.
To strike a balance, active airflow management is essential. Installing a quiet, high-quality exhaust fan with a built-in thermostat ensures hot air is expelled before temperatures reach dangerous levels. Vents and ducting can facilitate continuous airflow, preventing hot spots and maintaining safe operating temperatures. The goal is to create a controlled environment where heat is effectively removed without introducing additional noise or drafts.
For example, a DIY enthusiast used a small, silent inline fan connected to a thermostat to keep his GPU below 70°C. This setup maintained operational temperatures, kept noise levels low, and prevented thermal throttling. The tradeoff is that ventilation systems add complexity and cost but are critical for long-term reliability. Neglecting heat dissipation in a closet rig can lead to hardware failure, overheating noise, and increased fan noise—defeating the purpose of the setup. Proper cooling isn’t optional; it’s foundational to a successful, quiet closet rig. You can learn more about effective cooling solutions in Acoustic Dampening, Placement, and the "Rig in the Closet" Setup.

VEVOR Portable Vocal Booth, 6.56 ft Height, Portable Recording Studio with Travel Bag, Mobile Tablet Stand, Thickened Soundproofing, Sound Isolation Booth for Echo-Free Vocals, Podcasts, Voiceovers
Say Goodbye to Echoes: Built with durable Oxford cloth and acoustic padding, this recording booth for the home...
As an affiliate, we earn on qualifying purchases.
As an affiliate, we earn on qualifying purchases.
Frequently Asked Questions
What’s the difference between acoustic dampening and soundproofing?
Acoustic dampening reduces echoes and reflections inside a space, making it sound less echoey. Soundproofing blocks sound from escaping or entering, preventing noise from leaking out or outside noise from coming in. They work together but serve different goals.
How much of the closet should be covered with treatment?
Focus on the main reflection points — behind the mic, the wall directly in front — and treat corners for bass. Covering every surface isn’t necessary and can even cause dead spots. Tiny closets may benefit from more coverage, but always prioritize reflection points and sealing gaps first. For more detailed advice, see Acoustic Dampening, Placement, and the "Rig in the Closet" Setup.
Where should I position the microphone in my closet booth?
Position the mic facing away from hard, reflective surfaces, ideally toward a treated wall or corner. Keep it about 6-12 inches from your mouth, use a shock mount, and avoid pointing directly at reflective surfaces to get clear, professional vocals. Proper positioning reduces room influence and minimizes unwanted echoes or comb filtering. Experimenting with mic angles and distances can further improve clarity—closer mics capture more direct sound and less room ambience, but too close can cause proximity effect. Use the treated environment to your advantage by aligning mic directionality with the least reflective surfaces.
Do foam panels actually work?
Yes, foam panels help reduce echo and reflections, especially at mid and high frequencies. But they don’t block sound leaks or low frequencies. For full isolation, combine foam with sealing, barriers, and proper placement. Foam panels are effective at controlling internal reflections but are limited in preventing external sound leaks. They are most useful when placed at reflection points and in conjunction with other measures like sealing gaps, adding bass traps, or creating physical barriers. Recognizing their limitations helps set realistic expectations and guides you to a more comprehensive acoustic treatment plan.
How can I deal with the door gap?
Seal gaps around the door with weatherstripping or draft excluders. Drape a heavy blanket over the door if needed. These simple fixes drastically cut sound leaks and improve overall soundproofing. While sealing gaps improves containment, it’s important to consider airflow—completely airtight seals can cause heat buildup. Combining sealing with ventilation solutions ensures your rig stays cool and quiet. Using door sweeps or draft stoppers at the bottom, along with sealing the sides, can significantly reduce sound leakage without compromising airflow. The tradeoff is between sound isolation and heat dissipation; balancing both is key to a functional, quiet closet studio.
Conclusion
If you want a quiet, professional-sounding space, remember this: the best fix isn’t just adding foam. It’s about smart placement, sealing the gaps, and managing heat. Your closet can become a surprisingly effective studio — if you treat it like a system, not just a box.
Think beyond foam panels. Use distance, ventilation, and strategic treatment to turn noise into silence, and echo into clarity. Your voice, your AI, your workflow — all will thank you for it.